Introduction:
Silverlight 2 is finally out and I'm thinking, the best way to learn it is to build a small web application using this
wonderful technology. And that's exactly what we're going to do here. We're going to build a Web Chat using
Silverlight 2. I'm also going to share some of the things I found out/learned with regards to this new technology. Here's
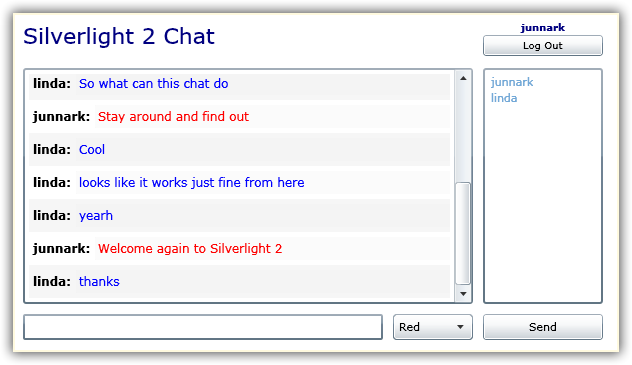
a snapshot of the Silverlight 2 Web Chat application that we're going to build.
 Requirements:
We will create a very simple web chat application using Silverlight 2 from scratch
just for fun. This chat application will contain 2 Xaml user controls, the login control and the chatroom control. Most of the tutorial will be focused on the
chatroom page. Some of the things that I want to accomplish are as follows:
- Must be accessible anywhere, and no need to download and install any components. This is why we're going to create a web chat.
- Web chat must be "flicker-free". You'll find out that all processing in Silverlight is done asynchronously.
- We want to be able to monitor chat conversations using a database. We will use MS SQL Server to store conversations and user information.
- Use of dynamic SQL using LINQ-to-SQL instead of stored procedures for a super fast coding.
The Fun Begins!
1. First, we need to build our database using MS SQL Server 2005/2008. For simplicity, we will go ahead and use the
database that we built on the earlier blog, for the LINQ Web Chat Application in part 2. To see
the
Build a Web Chat Application Part 2 - Chat with Other Users Privately,
click
here.
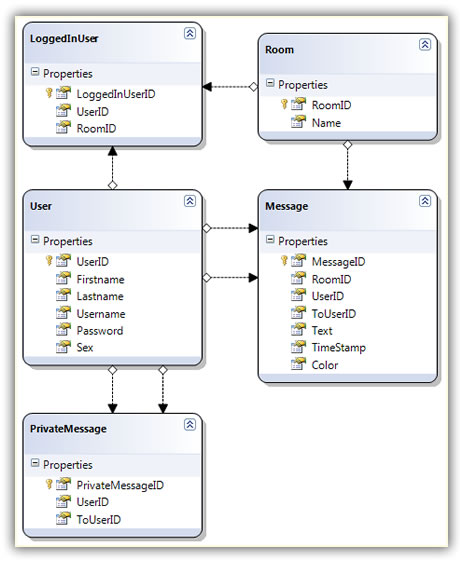
- User: Contains user information. Feel free to add your own fields like address, city, and so on.
- Message: Will hold the messages sent by the users while chatting.
- Room: Contains information about different rooms. This means that you can have more than one room. But for the purposes of this tutorial, we will only use one room for now.
- LoggedInUsers: Will hold users logged-in/chatting in the chatroom(s). In short, if a user enters in a room, we will save their information here, in this way, we can show the list of users chatting in a specific room.
2. In Visual Studio, Create a new Silverlight Application project. You can do this by going to the File menu,
select New, then click
Project. In the New Project box, click Silverlight under the Project Types, then choose Silverlight Application under Templates,
type in a name for this application. Then click ok.
On the next window, choose "Add a new ASP.Net Web Project...." and then click ok. In the solution explorer you will notice that a
Silverlight application and an ASP.Net Web Project was created. We will use the generated web project to host our Silverlight 2 Chat
application.
3. Let me talk about some of the things that were generated when we created this Silverlight application. In the Silverlight application
you will notice that there are two (2) XAML files, App.xaml and Page.xaml. Xaml files, unlike ASP.Net webforms are user controls that needs to be hosted
in an ASP.net Webform or Html page. All Xaml files, by default, can be hosted in a single web page. Of course you can also host
one Xaml file/user control per web page, which I don't recommend.
-
App.xaml: Works kind-of-like the Global.asax in ASP.net. This is the very first control that is hit by a Silverlight application. Since Silverlight is a client-side technology, it does not have Sessions, nor can you do
Response.Redirect to the next user control. This is where we can store variables/properties that can be available
to other user controls, of course this is only possible if you're hosting the other user controls in the same ASP.Net page.
-
Page.xaml: By default, without changing any code, this is the user control that the
generated ASP.Net web page will be hosting when you created your proeject. For the purposes
of this tutorial, we will not use this user control. We will instead create our own and
name them in accordance to their usage.
In the web application side, you will also notice the following files:
-
Default.aspx: This file is not used at all. So we will delete it in our project.
-
Chatroom.aspx: This is the actual page that will be hosting our Silverlight user control. You can set this as your
start page. You will also notice that this file references a ".xap" file which is located in the ClientBin folder. When
you look under the ClientBin folder, there's no .xap file when you first created your project. Build your web project,
the .xap will now be under the ClientBin folder. The generated .xap file is the compiled Silverlight application.
-
Silverlight2ChatTestPage.html: Silverlight error page catcher. When a Silverlight error occurs, this page is shown as a pop up.
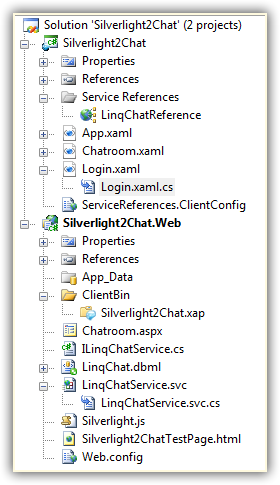
Here's a snapshot of the Silverlight 2 Chat project.
Now that you're familiar with a Silverlight application being hosted in an ASP.Net web page, we will now move on to the
Web chat tutorial.
4. I created 2 user controls; Login.xaml and Chatroom.xaml, mainly so that I can show you how to move from one user control to next,
and vice versa. I also wanted to show how to remember a user between user controls, somewhat a Session effect. Simple enough,
you probably would have already guessed that these user controls are used to Login and Chat respectively.
5. You need to login before you can start chatting. The users must exist in your LinqChat User table. A room must also exist in
the LinqChat Room table. This room must have a RoomID = 1, I hard-coded this in the Chatroom.xaml.cs. Of course you can have
more than one room, but for the purposes of this tutorial, we only need one.
The XAML User Controls
In Silverlight 2 there are 3 basic XAML container controls; the Canvas, StackPanel, and the Grid control. In this project, we will be using
the Grid and the StackPanel controls. The Grid works like an HTML table, rather than using TR for rows and TD for columns, it uses RowDefinitions
and ColumnDefinitions respectively. The StackPanel can hold other XAML controls in a stack, either horizontally or vertically. For more information
on these on controls please visit the silverlight website at http://www.silverlight.net.
Login.xaml
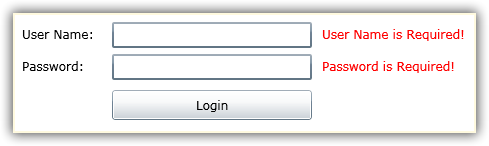
Shown below is the XAML UI code that generates the simple login UI shown above. You will notice that all
the XAML controls are contained in a Grid control. The positioning of the controls are very much self explanatory
when you look at the green comments that I put there. There are a few things that I want to point out:
1. The error message controls are all "hidden", marked as Visibility="Collapsed". We control the visibility of these
error messages in the code behind.
2. To mimic the ASP.Net validator controls I added the LostFocus and MouseEnter events in the User Name and Password controls.
<UserControl x:Class="Silverlight2Chat.Login"
xmlns="http://schemas.microsoft.com/winfx/2006/xaml/presentation"
xmlns:x="http://schemas.microsoft.com/winfx/2006/xaml"
Width="510" Height="118">
<Grid x:Name="LayoutRoot" Background="White" ShowGridLines="False">
<Grid.RowDefinitions>
<RowDefinition Height="10" /> <!-- padding -->
<RowDefinition Height="26" /> <!-- username -->
<RowDefinition Height="6" /> <!-- padding -->
<RowDefinition Height="26" /> <!-- password -->
<RowDefinition Height="10" /> <!-- padding -->
<RowDefinition Height="30" /> <!-- button -->
<RowDefinition Height="6" /> <!-- padding -->
</Grid.RowDefinitions>
<Grid.ColumnDefinitions>
<ColumnDefinition Width="10" /> <!-- padding -->
<ColumnDefinition Width="80" /> <!-- labels -->
<ColumnDefinition Width="10" /> <!-- padding -->
<ColumnDefinition Width="200" /> <!-- controls -->
<ColumnDefinition Width="10" /> <!-- padding -->
<ColumnDefinition Width="*" /> <!-- error messages -->
<ColumnDefinition Width="10" /> <!-- padding -->
</Grid.ColumnDefinitions>
<!-- labels -->
<TextBlock Text="User Name:" Grid.Row="1" Grid.Column="1" FontSize="12" VerticalAlignment="Center" />
<TextBlock Text="Password:" Grid.Row="3" Grid.Column="1" FontSize="12" VerticalAlignment="Center" />
<!-- controls -->
<TextBox x:Name="TxtUserName" Grid.Row="1" Grid.Column="3" FontSize="12" BorderThickness="2"
LostFocus="TxtUserName_LostFocus" MouseEnter="TxtUserName_MouseEnter" />
<PasswordBox x:Name="PbxPassword" Grid.Row="3" Grid.Column="3" FontSize="12" BorderThickness="2"
LostFocus="PbxPassword_LostFocus" MouseEnter="PbxPassword_MouseEnter" />
<Button x:Name="BtnLogin" Grid.Row="5" Grid.Column="3" Content="Login" FontSize="12" Click="BtnLogin_Click" />
<!-- error messages -->
<TextBlock x:Name="TxtbUserNameRequired" Text="User Name is Required!" Foreground="Red"
Grid.Row="1" Grid.Column="5" FontSize="12" VerticalAlignment="Center" Visibility="Collapsed" />
<TextBlock x:Name="TxtbPasswordRequired" Text="Password is Required!" Foreground="Red"
Grid.Row="3" Grid.Column="5" FontSize="12" VerticalAlignment="Center" Visibility="Collapsed" />
<TextBlock x:Name="TxtbNotfound" Text="Invalid Username or Password!" Foreground="Red"
Grid.Row="5" Grid.Column="5" FontSize="12" VerticalAlignment="Center" Visibility="Collapsed" />
</Grid>
</UserControl>
When the user clicks the Login button, a variable that tell's us that the user already clicked the Login button at least once is set to true. This will help us validate the
username or password control from the client-side using the LostFocus and MouseEnter events, without the need for the user to re-click the Login button, therefore
mimicking the ASP.Net validation controls before we actual validate the username and password on the server.
24 private void BtnLogin_Click(object sender, RoutedEventArgs e)
25 {
26 _isLoginButtonClicked = true;
27 ValidateUserName();
28 ValidatePassword();
29
30 if (!String.IsNullOrEmpty(TxtUserName.Text) && !String.IsNullOrEmpty(PbxPassword.Password))
31 {
32 // validate user based on the username and password
33 ValidateUser();
34 }
35 }
The ValidateUserName and ValidatePassword methods only checks if the User Name and Password boxes are not empty, then shows or hides the error message accordingly.
49 private void ValidateUserName()
50 {
51 if (String.IsNullOrEmpty(TxtUserName.Text))
52 TxtbUserNameRequired.Visibility = Visibility.Visible;
53 else
54 TxtbUserNameRequired.Visibility = Visibility.Collapsed;
55 }
56
57 private void ValidatePassword()
58 {
59 if (String.IsNullOrEmpty(PbxPassword.Password))
60 TxtbPasswordRequired.Visibility = Visibility.Visible;
61 else
62 TxtbPasswordRequired.Visibility = Visibility.Collapsed;
63 }
In the ValidateUser method, we're using a WCF (Windows Communication Foundation) service to validate the user name and password entered by the user. If the user is found in the database,
the user is then redirected to the chatroom XAML, if not, an error messages is shown. We will go back on this in a little bit, but first let me talk about the WCF Service.
The Windows Communication Foundation (WCF) Service
Since Silverlight is a client-side technology, there are a few ways to handle database access, all of which uses some kind of AJAX technology, or JavaScript. I prefer using WCF over
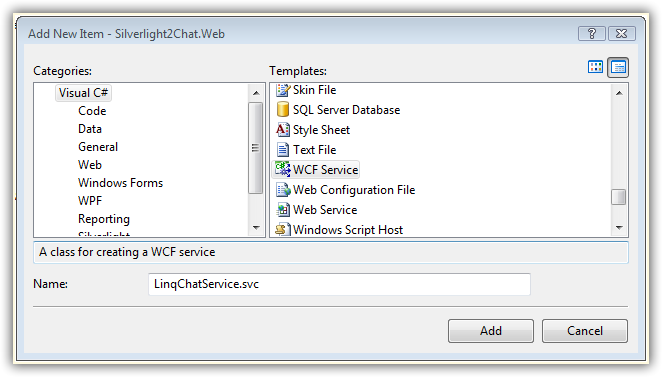
classic Web Service (.asmx) technology. To add a WCF Service, right-click on the web project, select Add new item, then select "WCF Service", as shown below. When you click Add,
3 files are added to the web project; a ".svc" file, the respective code file ".svc.cs", and an Interface file "
I....
.cs". An entry in the Web.config
file is also inserted.
Interface
This interface file serves as a base interface for the WCF service. This is where we define all the methods that the WCF service is going to implement. You will also notice that the
interface is marked as a ServiceContract. Each one of the methods are marked as an OperationContract.
12 [ServiceContract]
13 public interface ILinqChatService
14 {
15 [OperationContract]
16 int UserExist(string username, string password);
17
18 [OperationContract]
19 List<MessageContract> GetMessages(int messageID, int roomID, DateTime timeUserJoined);
20
21 [OperationContract]
22 void InsertMessage(int roomID, int userID, int? toUserID, string messageText, string color);
23
24 [OperationContract]
25 List<UserContract> GetUsers(int roomID, int userID);
26
27 [OperationContract]
28 void LogOutUser(int userID, int roomID, string username);
29 }
You will also notice that I created 2 public classes inside this interface. The classes simply defines the properties of the respective DataContract. Also, you will notice that the
data members of the MessageContract class directly maps to the Message table, and the UserContract class data members directly maps to the User table in the database. Note: I only added
the data members we will be using for the purposes of this tutorial. Also, because I'm a bit a lazy when I did this, I embedded these 2 classes inside the interface, I could have as easily
made two separate public classes instead.
31 [DataContract]
32 public class MessageContract
33 {
34 [DataMember]
35 public int MessageID;
36
37 [DataMember]
38 public string Text;
39
40 [DataMember]
41 public string UserName;
42
43 [DataMember]
44 public string Color;
45 }
46
47 [DataContract]
48 public class UserContract
49 {
50 [DataMember]
51 public int UserID;
52
53 [DataMember]
54 public string UserName;
55 }
Implementing the Interface in the LinqChatService
The interface is implemented in the WCF service code behind file, "LinqChatService.svc.cs".
To implement the interface, first, we need to inherit the interface as shown
below. The inheritance is coded by default.
11 public class LinqChatService : ILinqChatService
Right-click on the inteface "ILinqChatService", select Implement Interface, then select Implement Interface Explicitly as shown below. This will generate the interface's members
inside a region tag.
 Interface Member Methods
Now that you know how to implement the members of an interface, we will now talk about the implementation of each of the member methods. Each of the member methods accesses the database
through the use of LINQ-to-SQL. I also named each one of the methods sensibly enough based on their operation.
1.
InsertMessage: We use this method to insert one message in the database at a time. This operation is called when a user types a message in the chat room and then hits the send button.
13 void ILinqChatService.InsertMessage(int roomID, int userID, int? toUserID, string messageText, string color)
14 {
15 Message message = new Message();
16 message.RoomID = roomID;
17 message.UserID = userID;
18 message.ToUserID = toUserID;
19 message.Text = messageText;
20 message.Color = color;
21 message.TimeStamp = DateTime.Now;
22
23 LinqChatDataContext db = new LinqChatDataContext();
24 db.Messages.InsertOnSubmit(message);
25
26 try
27 {
28 db.SubmitChanges();
29 }
30 catch (Exception)
31 {
32 throw;
33 }
34 }
2.
GetMessages: We use this method to get the messages for a specific room from the time the logged-in user joined the room. This only gets the messages that have not been retrieved
yet, this is the reason why we're passing the messageID of the last message that we retrieved from the previous calls on this method. The code timeUserJoined.AddSeconds(1) highlighted below restrains
the messages retrieved 1 second past the the time the logged-in user joined the room, this is because, when a user joins the room, a message is inserted in the database saying
"user joined the room". All the other chatters will see this message, except the logged-in user.

Another thing to note is the foreach loop. First thing that comes to mind is: why can't we just return a Generic list of type List<Message>? The interface does not understand complex types
unless defined explictly as a DataContract. This is the reason why we created an almost exact copy of the Message table members and explicitly defined it as
a MessageContract class, where each member of the DataContract is a DataMember.
36 List<MessageContract> ILinqChatService.GetMessages(int messageID, int roomID, DateTime timeUserJoined)
37 {
38 LinqChatDataContext db = new LinqChatDataContext();
39
40 var messages = (from m in db.Messages
41 where m.RoomID == roomID &&
42 m.MessageID > messageID &&
43 m.TimeStamp > timeUserJoined.AddSeconds(1)
44 orderby m.TimeStamp ascending
45 select new { m.MessageID, m.Text, m.User.Username, m.TimeStamp, m.Color });
46
47 List<MessageContract> messageContracts = new List<MessageContract>();
48
49 foreach (var message in messages)
50 {
51 MessageContract messageContract = new MessageContract();
52 messageContract.MessageID = message.MessageID;
53 messageContract.Text = message.Text;
54 messageContract.UserName = message.Username;
55 messageContract.Color = message.Color;
56 messageContracts.Add(messageContract);
57 }
58
59 return messageContracts;
60 }
3.
GetUsers: This method gets all the users in a specific room. First it checks if the logged-in user is in the LoggedInUser table, if not, the user is inserted (line 75-82). The
reason for this check is because I streamlined the inserting of the new user, when the user first enters the chatroom he/she is inserted into the LoggedInUser table. Every other call to get users just
retrieves all the users from the database.
Just like the GetMessages method, we're assigning all the retrieved users to the UserContract Data Contract class (line 92-97).
62 List<UserContract> ILinqChatService.GetUsers(int roomID, int userID)
63 {
64 LinqChatDataContext db = new LinqChatDataContext();
65
66 // let's check if this authenticated user exist in the
67 // LoggedInUser table (means user is logged-in to this room)
68 var user = (from u in db.LoggedInUsers
69 where u.UserID == userID
70 && u.RoomID == roomID
71 select u).SingleOrDefault();
72
73 // if user does not exist in the LoggedInUser table
74 // then let's add/insert the user to the table
75 if (user == null)
76 {
77 LoggedInUser loggedInUser = new LoggedInUser();
78 loggedInUser.UserID = userID;
79 loggedInUser.RoomID = roomID;
80 db.LoggedInUsers.InsertOnSubmit(loggedInUser);
81 db.SubmitChanges();
82 }
83
84 // get all logged in users to this room
85 var loggedInUsers = from l in db.LoggedInUsers
86 where l.RoomID == roomID
87 orderby l.User.Username ascending
88 select new { l.User.Username };
89
90 List<UserContract> userContracts = new List<UserContract>();
91
92 foreach (var loggedInUser in loggedInUsers)
93 {
94 UserContract userContract = new UserContract();
95 userContract.UserName = loggedInUser.Username;
96 userContracts.Add(userContract);
97 }
98
99 return userContracts;
100 }
4.
UserExist: Checks if a user exist. If the user exist it returns the userID, if not it returns -1. This method is called from the Login.xaml code behind file to check
if the username and password entered by the user exist in the database. Why am I returning the userID, and why just the userID? From the time the user logs in, the application remembers
the userID and user name of that user, much like a Session effect. To minimize the data retrieved, all we really need at this point is the userID, since the user name was already provided
through the username TextBox from the login page.
102 int ILinqChatService.UserExist(string username, string password)
103 {
104 int userID = -1;
105
106 LinqChatDataContext db = new LinqChatDataContext();
107
108 var user = (from u in db.Users
109 where u.Username == username
110 && u.Password == password
111 select new { u.UserID }).SingleOrDefault();
112
113 if (user != null)
114 userID = user.UserID;
115
116 return userID;
117 }
5.
LogOutUser: Simple, logs out the user. Lines 124-130 deletes the user from the LoggedInUser table. Lines 133-142 inserts a message in the Message table saying that the user
left the room so that the other users can see this message when a user logs out. Again I streamlined the database access, rather than doing another query based on the userID to get the username
of the user that is logging out, this method expects the username as highlighted below. This is the reason why we're remembering the username of the current user logged in to this chatroom,
I'll talk about how this is done in a bit. This method is called when you click the logout button in the Chatroom.xaml UI.
Note: You can also easily log out a user when the user clicks the close button of a browser by catching the onunload event of the body tag. For more information on how to do this,
please see my other article titled
Build a Web Chat Application using ASP.Net 3.5, LINQ and AJAX .
119 void ILinqChatService.LogOutUser(int userID, int roomID, string username)
120 {
121 // log out the user by deleting from the LoggedInUser table
122 LinqChatDataContext db = new LinqChatDataContext();
123
124 var loggedInUser = (from l in db.LoggedInUsers
125 where l.UserID == userID
126 && l.RoomID == roomID
127 select l).SingleOrDefault();
128
129 db.LoggedInUsers.DeleteOnSubmit(loggedInUser);
130 db.SubmitChanges();
131
132 // insert user "left the room" text
133 Message message = new Message();
134 message.RoomID = roomID;
135 message.UserID = userID;
136 message.ToUserID = null;
137 message.Text = username + " left the room.";
138 message.Color = "Gray";
139 message.TimeStamp = DateTime.Now;
140
141 db.Messages.InsertOnSubmit(message);
142 db.SubmitChanges();
143 }
Web.config and WCF
When we added a WCF Service to our web application a few lines lines of code was also automatically added to the Web.config file in the system.ServiceModel tag. Although everything
here is standardized, one thing I want to point out is the binding information in line 126. By default it will be coded as "wsHttpBinding", we need to change it
to basicHttpBinding as shown and highlighted below.
109 <system.serviceModel>
110 <behaviors>
111 <endpointBehaviors>
112 <behavior name="Silverlight2Chat.Web.Service1AspNetAjaxBehavior">
113 <enableWebScript />
114 </behavior>
115 </endpointBehaviors>
116 <serviceBehaviors>
117 <behavior name="Silverlight2Chat.Web.LinqChatServiceBehavior">
118 <serviceMetadata httpGetEnabled="true" />
119 <serviceDebug includeExceptionDetailInFaults="false" />
120 </behavior>
121 </serviceBehaviors>
122 </behaviors>
123 <services>
124 <service behaviorConfiguration="Silverlight2Chat.Web.LinqChatServiceBehavior"
125 name="Silverlight2Chat.Web.LinqChatService">
126 <endpoint address="" binding="basicHttpBinding" contract="Silverlight2Chat.Web.ILinqChatService">
127 <identity>
128 <dns value="localhost" />
129 </identity>
130 </endpoint>
131 <endpoint address="mex" binding="mexHttpBinding" contract="IMetadataExchange" />
132 </service>
133 </services>
134 </system.serviceModel>
Remembering Information and Moving from One XAML User Control to the Next
As I mentioned earlier, Silverlight is a client-side technology. This means that we cannot use Session Objects to remember things nor can we use the famous Response.Redirect command
to go to the next page/XAML user control. Although you can host one XAML file per ASP.Net WebForm, Silverlight is not designed this way, you should flip or move from one XAML file to the next hosted by the
same ASP.Net WebForm or Html. By default, when you create a Silverlight application, a Page.xaml file is generated. This is also the default XAML user control that is used or hosted when you
run your Silverlight application. We don't really need the Page user control, so I deleted it. Instead, I added 2 user controls; Login.xaml and Chatroom.xaml. We will be moving back and forth
from the Login.xaml to the Chatroom.xaml and vice versa using the App.xaml web user control.
App.xaml is the Silverlight application-wide user control. This where we can set-up which user control will be shown or called first in our application. This is
also where we can remember things like the userID and user name. It also works like the Web.config where you can store your application-wide resources.
1. Setting Login.xaml as the default XAML user control: In the Application_Startup event of the App.xaml simply change "Page()" to "Login()" as shown in line 32.
28 private void Application_Startup(object sender, StartupEventArgs e)
29 {
30 // start at the login page
31 this.RootVisual = rootGrid;
32 rootGrid.Children.Add(new Login());
33 }
2. To move from the Login.xaml user control to the Chatroom.xaml and vice versa, I created a method called RedirectTo in the App.xaml user control
that accepts a User Control where we want to be redirected to. What we're doing here is removing the current user control and adding the user control
that we want to show to the user. This method is called from the login xaml after a user logs in
the chatroom and from the chatroom xaml when a user logs out. Code is shown below.
69 public void RedirectTo(UserControl usercontrol)
70 {
71 App app = (App)Application.Current;
72 app.rootGrid.Children.Clear();
73 app.rootGrid.Children.Add(usercontrol);
74 }
To redirect a user from the Login.xaml to the Chatroom.xaml, we do the following from the Login.xaml user control:
81 App app = (App)Application.Current;
82 app.UserID = userID;
83 app.UserName = TxtUserName.Text;
84 app.RedirectTo(new Chatroom());
3. To remember a value from one XAML User Control to the next, we need to create a public property for each of the values that we want remembered from the App.xaml user control.
76 public int UserID { get; set; }
77
78 public string UserName { get; set; }
79
80 public DateTime TimeUserJoined { get; set; }
Now that these properties are created we simply need to assign the values we want remembered from either the Login.xaml or the Chatroom.xaml. Code shown below from the Login.xaml.
81 App app = (App)Application.Current;
82 app.UserID = userID;
83 app.UserName = TxtUserName.Text;
Chatroom.xaml UI
There are a few things that I want to point out about the chatroom UI and all of them are highlighted below. You will notice that both the Messages and the User List are using Stack Panel controls,
but the data binding are different. The User List is using the DataTemplate tag which is a lot simpler, and binding all the UserName as a Hyperlink. On the other hand, the messages are bound in
the code behind. This is because the messages needs to show a more complex set of controls. As you have noticed in the snapshot of this chatroom, the messages can be of different colors, the
names and the message right beside them don't need to have the same colors. I will discuss more on this in a little bit.
A KeyDown event for the message TextBox (where the user types their messages) is also supplied so that we can check if the user hit the "enter key" of the keyboard. When the user hits the enter
key, the message is sent. Again, I will talk more about this a bit later.
<UserControl x:Class="Silverlight2Chat.Chatroom"
xmlns="http://schemas.microsoft.com/winfx/2006/xaml/presentation"
xmlns:x="http://schemas.microsoft.com/winfx/2006/xaml"
Width="600" Height="340">
<Grid x:Name="LayoutRoot" Background="White" ShowGridLines="False" Loaded="LayoutRoot_Loaded">
<Grid.RowDefinitions>
<RowDefinition Height="10" /> <!-- padding -->
<RowDefinition Height="38" /> <!-- title -->
<RowDefinition Height="10" /> <!-- padding -->
<RowDefinition Height="*" /> <!-- messages, userlist -->
<RowDefinition Height="10" /> <!-- padding -->
<RowDefinition Height="26" /> <!-- message text box, send button -->
<RowDefinition Height="10" /> <!-- padding -->
</Grid.RowDefinitions>
<Grid.ColumnDefinitions>
<ColumnDefinition Width="10" /> <!-- padding -->
<ColumnDefinition Width="*" /> <!-- messages, message text box-->
<ColumnDefinition Width="10" /> <!-- padding -->
<ColumnDefinition Width="120" /> <!-- user list, send button-->
<ColumnDefinition Width="10" /> <!-- padding -->
</Grid.ColumnDefinitions>
<TextBlock Text="Silverlight 2 Chat" Grid.Row="1" Grid.Column="1" FontSize="22" Foreground="Navy" />
<StackPanel Orientation="Vertical" Grid.Row="1" Grid.Column="3">
<TextBlock x:Name="TxtbLoggedInUser" FontSize="10" Foreground="Navy" FontWeight="Bold" HorizontalAlignment="Center" />
<Button x:Name="BtnLogOut" Content="Log Out" FontSize="10" Click="BtnLogOut_Click" />
</StackPanel>
<ScrollViewer x:Name="SvwrMessages" Grid.Row="3" Grid.Column="1"
HorizontalScrollBarVisibility="Hidden"
VerticalScrollBarVisibility="Visible" BorderThickness="2">
<StackPanel x:Name="SpnlMessages" Orientation="Vertical" />
</ScrollViewer>
<ScrollViewer x:Name="SvwrUserList" Grid.Row="3" Grid.Column="3"
HorizontalScrollBarVisibility="Auto"
VerticalScrollBarVisibility="Auto" BorderThickness="2">
<StackPanel x:Name="SpnlUserList" Orientation="Vertical">
<ItemsControl x:Name="ItmcUserList">
<ItemsControl.ItemTemplate>
<DataTemplate>
<HyperlinkButton Content="{Binding UserName}" />
</DataTemplate>
</ItemsControl.ItemTemplate>
</ItemsControl>
</StackPanel>
</ScrollViewer>
<StackPanel Orientation="Horizontal" Grid.Row="5" Grid.Column="1" >
<TextBox x:Name="TxtMessage" TextWrapping="Wrap" KeyDown="TxtMessage_KeyDown"
ScrollViewer.VerticalScrollBarVisibility="Visible"
ScrollViewer.HorizontalScrollBarVisibility="Disabled"
Width="360"
BorderThickness="2" Margin="0,0,10,0"/>
<ComboBox x:Name="CbxFontColor" Width="80">
<ComboBoxItem Content="Black" Foreground="White" Background="Black" IsSelected="True" />
<ComboBoxItem Content="Red" Foreground="White" Background="Red" />
<ComboBoxItem Content="Blue" Foreground="White" Background="Blue" />
</ComboBox>
</StackPanel>
<Button x:Name="BtnSend" Content="Send" Grid.Row="5" Grid.Column="3" Click="BtnSend_Click" />
</Grid>
</UserControl>
Chatroom.xaml.cs Code Behind
1. When the user is redirected to the Chatroom.xaml user control from the Login.xaml user control is; We check if user is logged-in by checking any of the values we stored in App.xaml, I chose
to check for the user name (line 34). If this value is empty, then the user have not logged-in yet, and therefore needs to be redirected to the login page (line 36).
32 App app = (App)Application.Current;
33
34 if (String.IsNullOrEmpty(app.UserName))
35 {
36 app.RedirectTo(new Login());
37 }
38 else
39 {
40 _userID = app.UserID;
41 _timeUserJoined = DateTime.Now;
42 TxtbLoggedInUser.Text = app.UserName;
43 }
2. Since we're using a Grid named "LayoutRoot" as our root or main container for all the other controls, the LayoutRoot_Loaded event is called when the Grid is loaded. And yes,
it mimics the Page_load event of an ASP.Net page.
46 private void LayoutRoot_Loaded(object sender, RoutedEventArgs e)
47 {
48 TxtMessage.Focus();
49 InsertNewlyJoinedMessage();
50 GetUsers();
51 SetTimer();
52 }
As you can see, a few things happen when the grid is loaded. One thing in particular that I want to discuss here is the focusing of the TxtMessage TextBox control,
which is where you type your messages. The TxtMessage.Focus() command shown above in line 48 does not work by itself alone, there are a few things that we need to do
to focus on this control when the grid is loaded.
The first thing we need to do along with the TxtMessage.Focus() code is to put a focus on the Silverlight ASP.Net Control in the hosting web page, which is the
Chatroom.aspx. As shown below, we can focus on the Silverlight ASP.Net control using JavaScript.
<%@ Page Language="C#" AutoEventWireup="true" %>
<%@ Register Assembly="System.Web.Silverlight" Namespace="System.Web.UI.SilverlightControls" TagPrefix="asp" %>
<!DOCTYPE html PUBLIC "-//W3C//DTD XHTML 1.0 Transitional//EN" "http://www.w3.org/TR/xhtml1/DTD/xhtml1-transitional.dtd">
<html xmlns="http://www.w3.org/1999/xhtml" style="height:100%;">
<head id="Head1" runat="server">
<title>Silverlight 2 Chatroom</title>
<script type="Text/javascript">
window.onload = function ()
{
document.getElementById('Xaml1').focus();
}
</script>
</head>
<body style="height:100%;margin:0; padding:0; width: 100%;">
<form id="form1" runat="server" style="height:100%;">
<asp:ScriptManager ID="ScriptManager1" runat="server" />
<asp:UpdatePanel ID="UpdatePanel1" runat="server">
<ContentTemplate>
<div style="width: 100%; text-align:center; height: 100%;">
<asp:Silverlight ID="Xaml1" runat="server" Source="~/ClientBin/Silverlight2Chat.xap" MinimumVersion="2.0.31005.0" Width="600" Height="100%" />
</div>
</ContentTemplate>
</asp:UpdatePanel>
</form>
</body>
</html>
3.
Using a Proxy to Access WCF Service Asyncrhonously: The following methods and/or events in the Chatroom.xaml.cs code behind file all accesses the WCF Service that we created
earlier.
- InsertNewlyJoinedMessage()
- GetUsers()
- InsertMessage()
- GetMessages()
- BtnLogOut_Click event
Take note that all processing done in a Silverlight application is done Asynchronously. When you are trying to get values coming from a WCF Service into a Silverlight application,
you will need to create a "Completed" event handler for the WCF proxy's Completed event as well as call the "Async" method of the WCF proxy. As an example, let's look
at the GetUsers() method in the Chatroom.xaml.cs.
Line 57 and lines 61-68 are really not needed if you're not going to retrieve any value from the WCF Service, like when we insert a value in the database. However in this case,
we're retrieving users and assigning the retrieved values in Silverlight controls. For this example, when the GetUsersAsync call has been completed, the GetUsersCompleted event
handler is called. The retrieved users (or retrieved value) are then assigned to the e.Result event arguments of the GetUserCompleted event handler. The e.Result return type is dynamic
based on the value being retrieved. So if we're just retrieving an int value, then it will be an int type, if we're retrieving a string value then it will be a string type and so on. For
this specific example, we're retrieving a collection that's why were assigning it to an ObservableColletion type.
Note that the GetUsersAsync method in line 58 has the same signature as the ILinqChatService.GetUsers method in the WCF Service, this is how we call the WCF Service method.
54 private void GetUsers()
55 {
56 LinqChatReference.LinqChatServiceClient proxy = new LinqChatReference.LinqChatServiceClient();
57 proxy.GetUsersCompleted += new EventHandler<Silverlight2Chat.LinqChatReference.GetUsersCompletedEventArgs>(proxy_GetUsersCompleted);
58 proxy.GetUsersAsync(_roomId, _userID);
59 }
60
61 void proxy_GetUsersCompleted(object sender, Silverlight2Chat.LinqChatReference.GetUsersCompletedEventArgs e)
62 {
63 if (e.Error == null)
64 {
65 ObservableCollection<LinqChatReference.UserContract> users = e.Result;
66 ItmcUserList.ItemsSource = users;
67 }
68 }
Here's the GetUsers method that we are calling in the WCF Service (LinqChatService.svc.cs). Notice that it's called GetUsers and we did not create a
GetUsers
Completed event handler or a GetUsers
Async method
62 List<UserContract> ILinqChatService.GetUsers(int roomID, int userID)
4.
Sending and Receiving Messages: You send messages when you click the enter key of your keyboard or when you hit the send button. When you click either the carriage return key or your keyboard
or the send button, two other things are executed along with saving your message to the database, you get the messages from the database, as well as get the users from the database.
209 private void SendMessage()
210 {
211 if(!String.IsNullOrEmpty(TxtMessage.Text))
212 {
213 InsertMessage();
214 GetMessages();
215 GetUsers();
216 }
217 }
Remember that we set up the timer when the main Grid loads.
77 private void SetTimer()
78 {
79 timer = new DispatcherTimer();
80 timer.Interval = new TimeSpan(0, 0, 0, 3, 0);
81 timer.Tick += new EventHandler(TimerTick);
82 timer.Start();
83
84 _isTimerStarted = true;
85 }
Every 3 seconds, when you don't hit the enter key of your keyboard, the timer tick event is called to get the messages and get the users from the database.
219 void TimerTick(object sender, EventArgs e)
220 {
221 GetMessages();
222 GetUsers();
223 }
The timer is stopped every single time you type in a message, and then resumes when you hit the enter key. This is done so that we can stop the timer to refresh our TxtMessage Box control
while we're typing.
186 private void TxtMessage_KeyDown(object sender, KeyEventArgs e)
187 {
188 if (e.Key == Key.Enter)
189 {
190 SendMessage();
191 timer.Start();
192 _isTimerStarted = true;
193 }
194 else
195 {
196 if (_isTimerStarted)
197 {
198 timer.Stop();
199 _isTimerStarted = false;
200 }
201 }
202 }
5.
Setting the Scroll Bar to the Bottom of the Messages: To set the scroll bar in the bottom of the messages we simply supply the highest double value int the
ScrollToVerticalOffset member of the Scroll Viewer XAML control.
179 private void SetScrollBarToBottom()
180 {
181 // set the scroll bar to the bottom
182 SvwrMessages.UpdateLayout();
183 SvwrMessages.ScrollToVerticalOffset(double.MaxValue);
184 }
6.
Showing the Messages in the Scroll View Control: Perhaps this is one of the most exciting part of this tutorial. While I was coding the Silverlight 2 Chat application this
is where I spent most of my time in. Getting all the messages and assigning them all in a ListBox XAML control just does not work for me. First I want to be able to have a different color or
different shade for the user and the message which is in the same line. I also wanted an alternating background for each of the message. This is accomplished by writting a little bit more
code than we did with the Users list. The good thing about doing it this way is that; we don't have to retrieve all the messages for the current room, instead, we just retrieve the ones that
we have not retrieved yet, because when you add a message to the panel control using this method, the UI remembers all that has been added, and there's no need to add them again.
In line 109, we're instantiating a horizontal stack panel which will be added to the base stack panel in line 167. We did this programmatically so that we can alternate the background color
as shown in lines 155-116. We're also adding a TextBlock which will hold the bold username in line 130, and a TextBox which will hold the message in line 164, to this stack panel. That
was simple enough.
So why am I using a TextBox (line 133) instead of a TextBlock for the message beside the Username? I noticed that there was a bug with Silverlight and I read up and
sure enough I was right. When using the KeyDown event of the message box, carriage returns are then encoded in the messages that you type when you hit the enter key. What that means
is that; the messages are cut in 2 lines in various places. For example: Let's say you typed "Hello how are you doing?" in the message text box, and then hit the enter key, the message
"Hello how are you doing?" will be cut in two lines when you assign the Text value of the message box to a TextBlock, so it should read like this:
Hello how are
you doing?
or this:
Hello
how are you doing?
We simply don't have any control where the newline character is inserted, not that we want it to be inserted anyway. Because of this bug, I noticed that assigning the Text value of the
message box to another TextBox fixes this problem.
100 void proxy_GetMessagesCompleted(object sender, Silverlight2Chat.LinqChatReference.GetMessagesCompletedEventArgs e)
101 {
102 if (e.Error == null)
103 {
104 ObservableCollection<LinqChatReference.MessageContract> messages = e.Result;
105
106 foreach (var message in messages)
107 {
108 // add a horizontal stack panel
109 StackPanel sp = new StackPanel();
110 sp.Orientation = Orientation.Horizontal;
111 sp.HorizontalAlignment = HorizontalAlignment.Left;
112 sp.Width = SpnlMessages.ActualWidth;
113
114 // put an alternating background
115 if (!_isWithBackground)
116 sp.Background = new SolidColorBrush(System.Windows.Media.Color.FromArgb(100, 235, 235, 235));
117
118 // add a TextBlock to hold the user's name to the stack panel
119 TextBlock name = new TextBlock();
120 name.Text = message.UserName + ": ";
121 name.FontSize = 12.0;
122 name.FontWeight = FontWeights.Bold;
123 name.Padding = new Thickness(4, 8, 0, 8);
124
125 if (message.Color == "Gray")
126 name.Foreground = new SolidColorBrush(Colors.Gray);
127 else
128 name.Foreground = new SolidColorBrush(Colors.Black);
129
130 sp.Children.Add(name);
131
132 // add a TextBox to hold the user's message to the stack panel
133 TextBox text = new TextBox();
134 text.BorderBrush = new SolidColorBrush(Colors.Transparent);
135 text.FontSize = 12.0;
136 text.Text = message.Text.Trim();
137 text.VerticalAlignment = VerticalAlignment.Top;
138 text.Width = SpnlMessages.ActualWidth - name.ActualWidth;
139 text.TextWrapping = TextWrapping.Wrap;
140 text.Margin = new Thickness(0, 4, 4, 0);
141 text.IsReadOnly = true;
142
143 // change text color based on the user's chosen color
144 if(message.Color == "Red")
145 text.Foreground = new SolidColorBrush(Colors.Red);
146 else if (message.Color == "Blue")
147 text.Foreground = new SolidColorBrush(Colors.Blue);
148 else if (message.Color == "Gray")
149 text.Foreground = new SolidColorBrush(Colors.Gray);
150 else
151 text.Foreground = new SolidColorBrush(Colors.Black);
152
153 // put an alternating background
154 if (!_isWithBackground)
155 {
156 text.Background = new SolidColorBrush(System.Windows.Media.Color.FromArgb(100, 235, 235, 235));
157 _isWithBackground = true;
158 }
159 else
160 {
161 _isWithBackground = false;
162 }
163
164 sp.Children.Add(text);
165
166 // add the horizontal stack panel to the base stack panel
167 SpnlMessages.Children.Add(sp);
168
169 // remember the last message id
170 _lastMessageId = message.MessageID;
171 }
172
173 SetScrollBarToBottom();
174 TxtMessage.Text = String.Empty;
175 TxtMessage.Focus();
176 }
177 }
7.
Logging Out: As soon as you click the logout button we stop the timer (line 227). Then we delete the user in the LoggedInUser table by calling the
WCF Service in line 229-230. Notice that we did not need to call a Completed event handler since we're not retrieving any values in the database. And lastly, we redirect the user to
the Login XAML user control.
As I mentioned earlier, you can also log-out the user when they hit the close button of the browser by catching the unload event of the body tag in the hosting ASP.Net page.
225 private void BtnLogOut_Click(object sender, RoutedEventArgs e)
226 {
227 timer.Stop();
228
229 LinqChatReference.LinqChatServiceClient proxy = new LinqChatReference.LinqChatServiceClient();
230 proxy.LogOutUserAsync(_userID, _roomId, TxtbLoggedInUser.Text);
231
232 // redirect to the login page
233 App app = (App)Application.Current;
234 app.RedirectTo(new Login());
235 }
Last Words:
Building this Silverlight 2 Web Chat Application was a fun learning experience for me. On my next blog/tutorial, I will be talking about how to chat with someone privately. As
you may have already noticed, the user links are left empty, of course I did this for a purpose. So watch out for my next blog.
As always, the code and the article are provided "As Is", there is absolutely no warranties. Use at your own risk.