Syncfusion is a popular company who makes software components used by developers worldwide. This tutorial will show how to use the back end code generated by
AspCoreGen3Razor as a datasource for a Syncfusion ASP.NET Core UI Data Grid Control. The Syncfusion ASP.NET Core UI Data Grid Control
will be able to dynamically get data on demand using paging and sorting by column.
The generated back end code (middle tier, data tier, web api, stored procedures, etc) for either
AspCoreGen3Razor or
AspCoreGen3MVC can be reused in any project that needs data from a Microsoft SQL Server database. You can reuse the
generated back end code in a web, mobile, desktop, or even web api projects. You can easily fill UI components with as little as one line of code using the generated code as a datasource.
Note: The code reuse also applies, but not limited to: SyncFusion Blazor, ASP.NET MVC UI, Angular, React, Xamarin UI, and many more.
You need the following for this tutorial:
- Microsoft Northwind Database (please Google it)
- Microsoft SQL Server 2003 and above
- You will need a User with an Admin username/password or with enough rights in the MS SQL Server (or Azure SQL). A blank username/password will not work.
- Visual Studio 2019 (the generated code will not work in Visual Studio 2017 and below)
- AspCoreGen 3.0 Razor Professional Plus or AspCoreGen 3.0 MVC Professional Plus (optional)
- AspCoreGen 3.0 Razor Ad-Hoc SQL Sample Project
- Syncfusion ASP.NET Core (EJ2) Demo Application
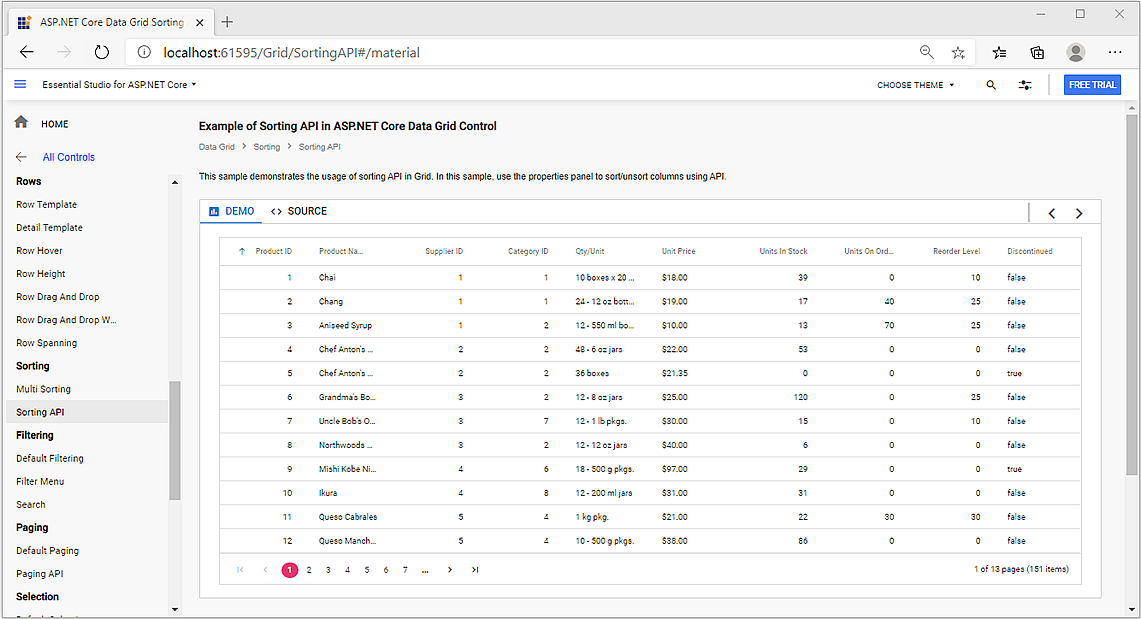
Here's a snapshot of what we're trying to do:
 Note:
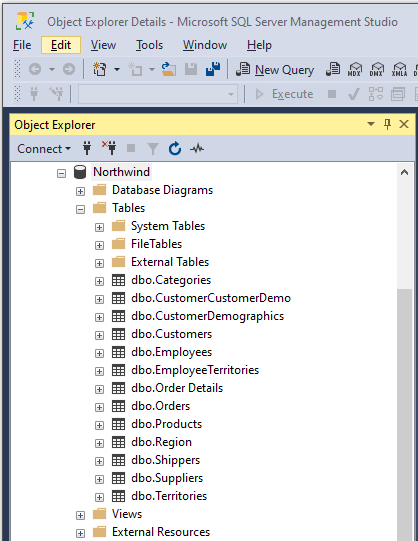
Note: You need to have the
Microsoft Northwind Database installed in a
Microsoft SQL Server for this tutorial. Download and installation of this database is beyond the scope
of this tutorial. We will be using the
Products table to retrieve rows of data from this database.
1. Download the
#5. Ad-Hoc SQL Sample Project here:
https://junnark.com/Products/AspCoreGen3Razor/GeneratedProjects. You will see the project towards
the bottom of the page. Click the
Download Sample Code link. This web application project was generated by
AspCoreGen3Razor, the solution
contains 2 projects, a Web Application and a reusable Class Library project. We only need the Class Library project which consist of the Business Object and Data Tier class files and we can discard the web application project.
FYI: You can download and use any of the six (6) projects from
AspCoreGen3Razor's Web Generated Project Examples or
AspCoreGen3MVC's Web Generated Project Examples. Or generate your own code using
AspCoreGen3Razor or
AspCoreGen3Razor. Any of these
will work, just follow along with the tutorial.
2. Download the
Syncfusion Community License. Install it in your computer and open the demo project in Visual Studio 2019.
FYI: You can use the Grid component for any Syncfusion products listed above, they will work just fine. If you already bought a Syncfusion License, then the demo application
should already be installed in your computer/system, in this case just follow along (no need to download). The Syncfusion Community License is free to individuals and small companies who makes less than a million dollars a year.*
3. Open the
EJ2CoreSampleBrowser.sln solution (in Visual Studio 2019) that was installed in your computer. In my case, the solution file can be found in
C:\Users\Public\Documents\Syncfusion\ASP.NET Core - EJ2\18.3.0.35 directory.
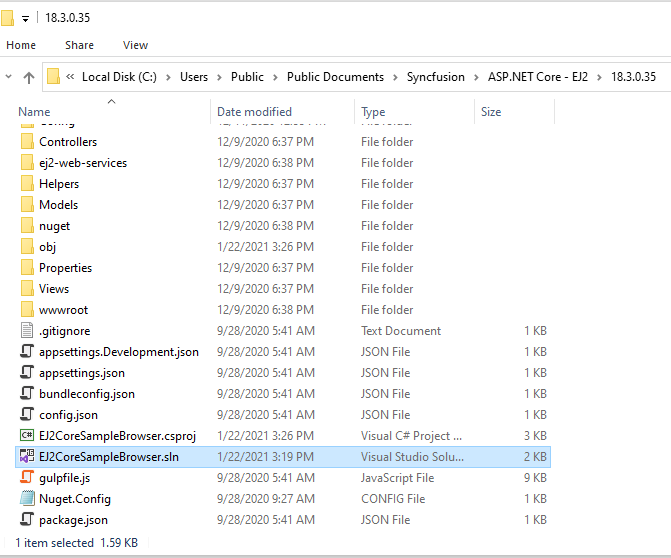
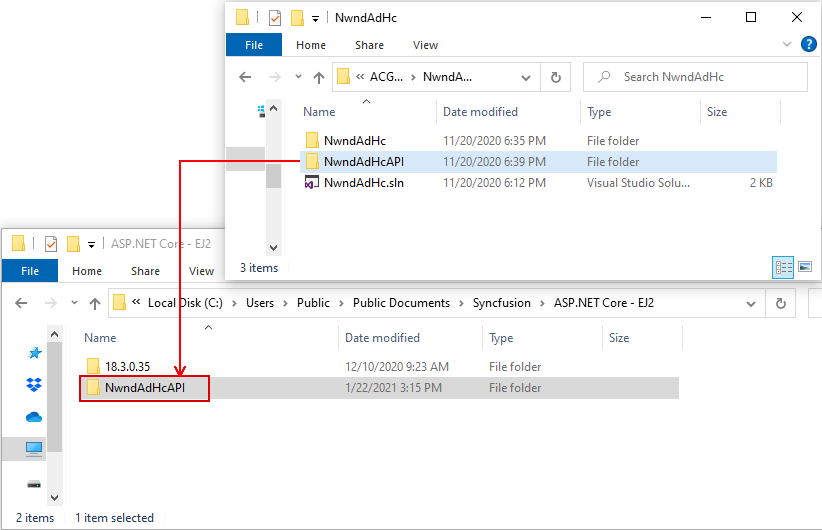
4. Copy the
Class Library Project (NwndAdHcAPI) that we downloaded in #1 to the
C:\Users\Public\Documents\Syncfusion\ASP.NET Core - EJ2\ folder, the
same folder where the
18.3.0.35 project/folder is located, as shown below.
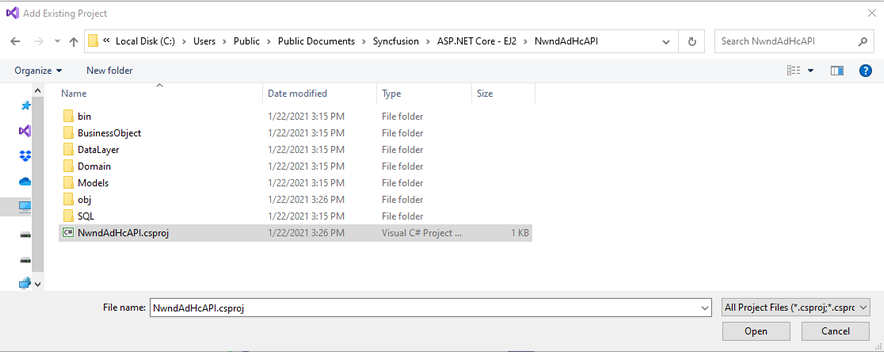
5. Back in Visual Studio, add the
NwndAdHcAPI.csproj to the
EJ2CoreSampleBrowser solution by adding an existing project as shown below.

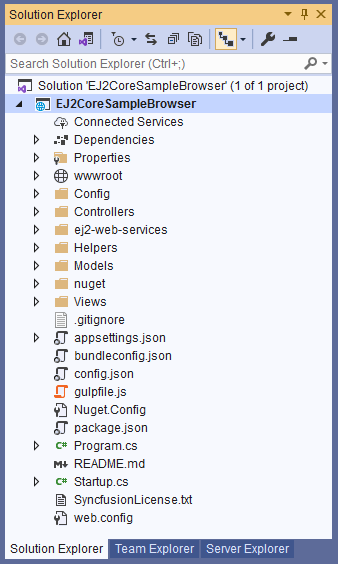
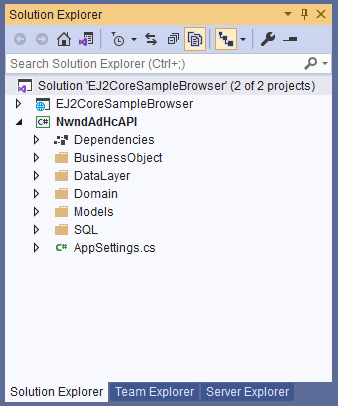
6. You should now have 2 projects showing in the Visual Studio Solution Explorer.
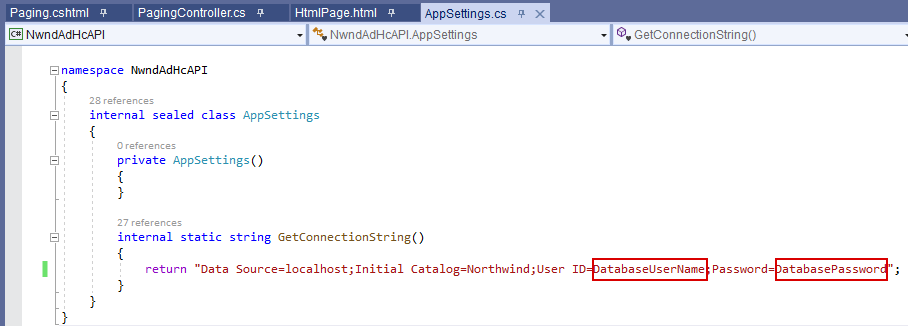
7. Open the
AppSettings.cs class under the
NwndAdHcAPI project and update the
DatabaseUserName and
DatabasePassword for the
Northwind Database that you're using.
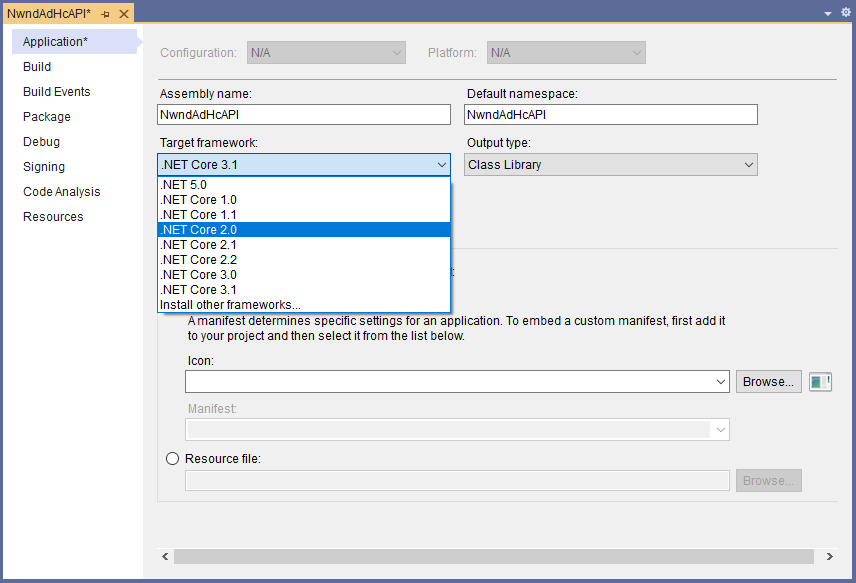
8. Change the
NwndAdHcAPI project's Target Framework to
.NET Core 2.0 from
.NET Core 3.1 because the
EJ2CoreSampleBrowser was made in
.NET Core 2.0. Right-click on the
NwndAdHcAPI project under the
Solution Explorer in Visual Studio, and then choose
Properties in the context menu. Under the
Target Framework, choose
.NET Core 2.0, and then save it.
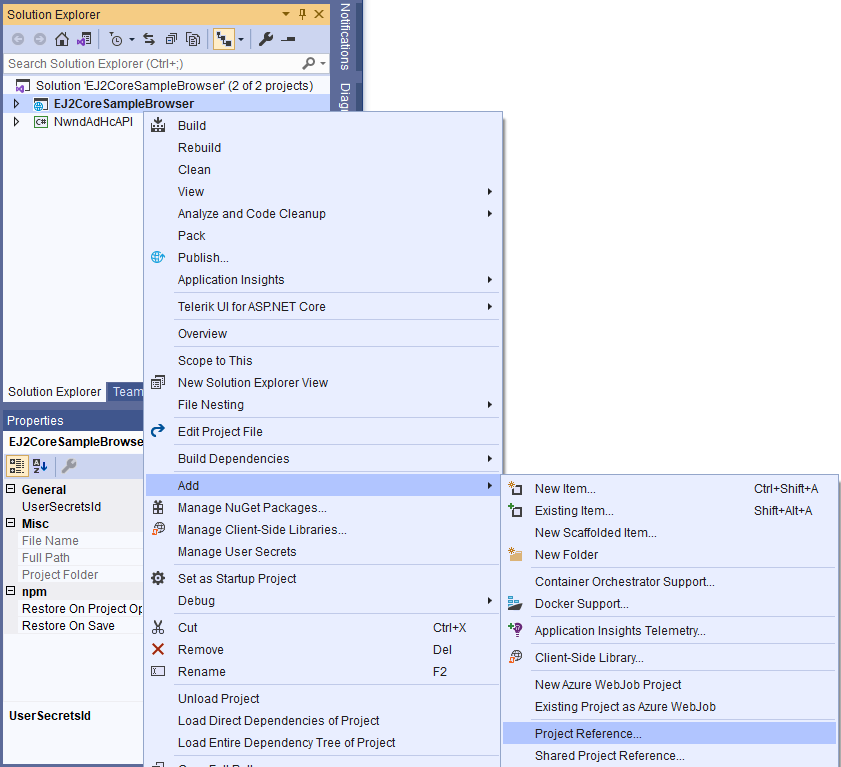
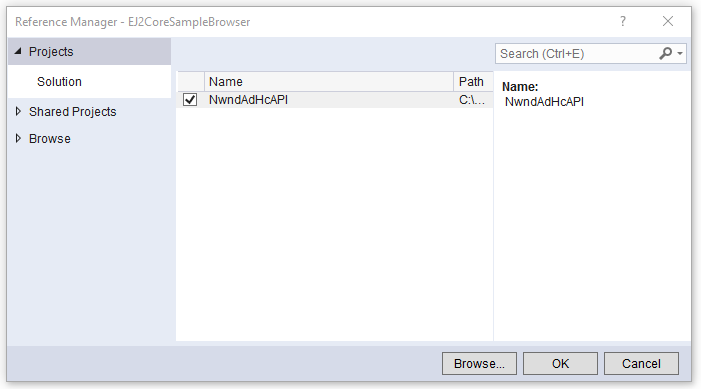
9. Now that both the
EJ2CoreSampleBrowser and
NwndAdHcAPI projects are using the same
Target Framework, add the
NwndAdHcAPI project as a
Project Reference to the
EJ2CoreSampleBrowser project.
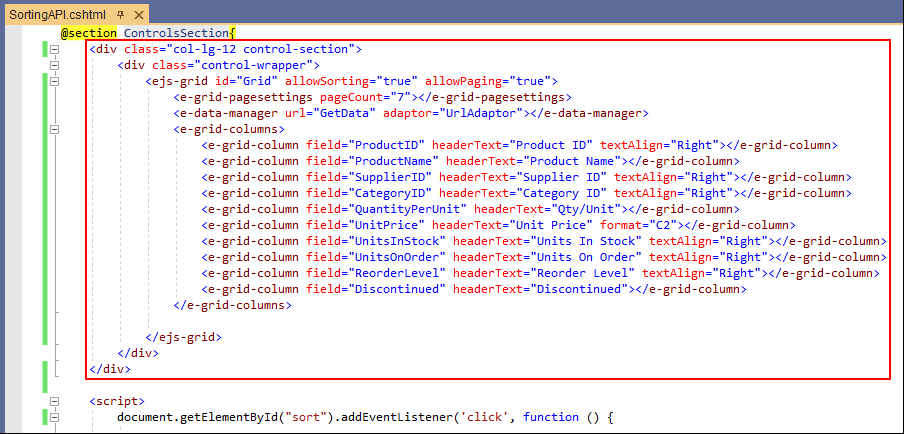
10. Instead of creating a new MVC view, we will update/edit an existing one. Open the
SortAPI.cshtml view in the
EJ2CoreSampleBrowser project, under the
Views/Grid folder. Delete
the code in the
div tags and replace with the code shown below:
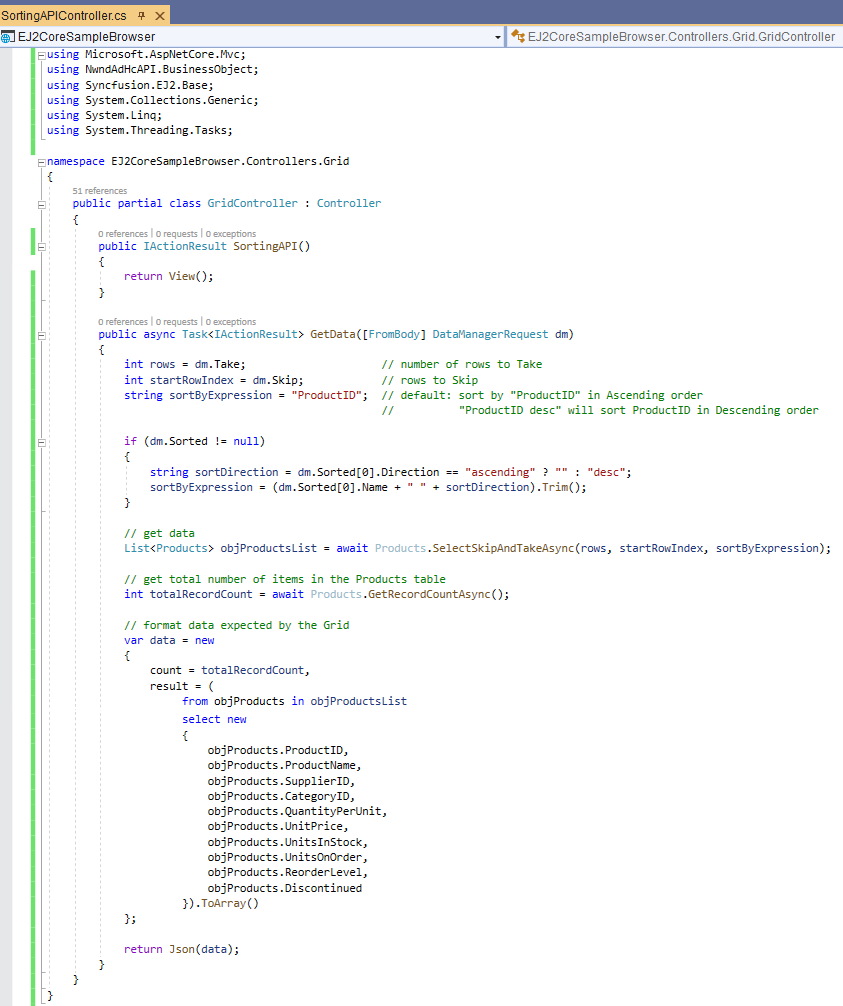
11. Now open the related
SortingAPIController.cs controller under the
Controllers/Grid folder. Update the code to what you see below:
The
GetData action method shown above will only return the amount of data the Syncfusion ASP.NET Core UI Data Grid component is asking for. The code that we deleted (Syncfusion example code) returns all data from
the database while the code we have above returns data on-demand.
The
GetData action method is called whenever an event is triggered on the Syncfusion ASP.NET Core UI Data Grid component found in the
SortAPI.cshtml view. When the Sort or the Paging event is triggered,
the Grid passes a
DataManagerRequest to the
GetData action method.
As shown below, with the
DataManagerRequest, we can figure out:
- How many
rows (Page Size) to get from the database
- Where to start taking data from the database (Skip)
- The Column/Field to Sort and the Sort Direction (Ascending or Descending)
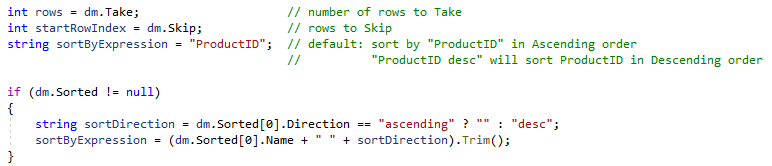
We can then retrieve just the right amount of data on-demand after getting these parameters.

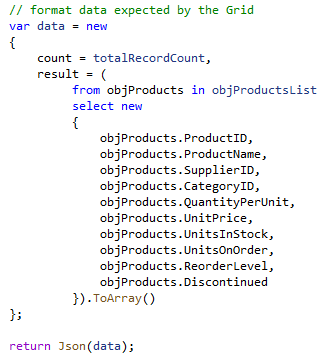
The Syncfusion ASP.NET Core UI Data Grid component expects the Total Number of Records for the specific Datasource it's using, for our example, it's grabbing data from the
Northwind database's
Products table. We need to return the Total Number of Records from the
Products table so that the Syncfusion ASP.NET Core UI Data Grid component will be able to calculate the number of Pages
to show.

The Syncfusion ASP.NET Core UI Data Grid component expects a JSON-formatted data that would contain parameters such as:
- count (Total Number of Records)
- result (Data)
12. Run the project by pressing F5 in Visual Studio. Go to the
Sorting API link under the
Sorting group.
Click around to see the functionality of the Syncfusion ASP.NET Core UI Data Grid component with data supplied by the
AspCoreGen3Razor Generated Code.
And we're done.
As always, the code and the article are provided "As Is", there is absolutely no warranties. Use at your own risk.